Introduction
In this article we will setup Docker and create our first custom build image for AppVeyor.
This article assumes you already setup AppVeyor OnPremise, of you did not already, then please go back and follow my guide on how to setup AppVeyor OnPremise on Ubuntu 18.x here.
Install Docker support
Run the following commands to setup docker on Ubuntu
apt-get remove docker docker-engine docker.io containerd runc
apt-get install ca-certificates gnupg-agent software-properties-common
curl -fsSL https://download.docker.com/linux/ubuntu/gpg | sudo apt-key add -
apt-key fingerprint 0EBFCD88
add-apt-repository "deb [arch=amd64] https://download.docker.com/linux/ubuntu $(lsb_release -cs) stable"
apt-get update
apt-get install docker-ce docker-ce-cli containerd.io
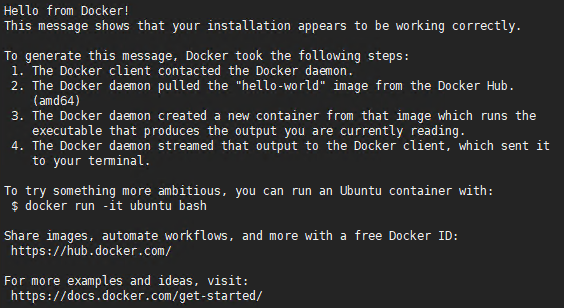
To test if it worked we run this to start a container that prints out Hello World:
docker run hello-world
You should see this message printed in the console:
Creating a custom AppVeyor Build Image
If you are familiar with AppVeyor Cloud, then you will be used to a whole range of images to choose from! This is not the case with AppVeyor OnPremise! It comes with a minimal Ubuntu Linux image with only the most basic AppVeyor hooks. So we need to use that image as a foundation to create our own custom image with the tools we need!
Let’s get started
Create Dockerfile
We create a Docker-file in /home that we can run to generate the image.
A Docker-file is essentially a special script where we can run commands and configure the image any way we want.
# Navigate to /home and create Dockerfile
# very important to not change the name
cd /home && nano /home/Dockerfile
here is the script that you can just paste in and the comments should hopefully explain what we are doing in each section.
The script mainly uses the RUN command, and that simply executes the Linux command inside the container, after all it is just regular Ubuntu Linux, so we call apt-get package manager here, but you are free to customize any way you want.
# DotNet Core 3.0 and NodeJS LTS for AppVeyor builds
# Created by Niels @ ITNiels.com

# Our base image to use
FROM appveyor/build-image:minimal-ubuntu-18.04

# Update Container OS
RUN sudo apt-get update
RUN sudo apt-get install -y apt-utils
RUN sudo apt-get -y upgrade

# Set Locale
RUN sudo apt-get install -y language-pack-en
RUN sudo echo "export LC_CTYPE=en_US.UTF-8" >> ~/.profile

# Install common tools
RUN sudo apt-get install -y wget
RUN sudo apt-get install -y curl
RUN sudo apt-get install -y apt-transport-https
RUN sudo apt-get install -y software-properties-common
RUN sudo apt-get install -y nano
RUN sudo apt-get install -y zip unzip

# Install the Microsoft DotNet Core repository
RUN sudo wget -q https://packages.microsoft.com/config/ubuntu/18.04/packages-microsoft-prod.deb
RUN sudo dpkg -i packages-microsoft-prod.deb
RUN sudo add-apt-repository universe
RUN sudo dpkg --purge packages-microsoft-prod && sudo dpkg -i packages-microsoft-prod.deb
RUN sudo apt-get update

# Install DotNet Core versions
# Add or remove ones you need
# Note these take up quite a bit of space each
RUN sudo apt-get install -y dotnet-sdk-2.1
RUN sudo apt-get install -y dotnet-sdk-2.2
RUN sudo apt-get install -y dotnet-sdk-3.0

# Run dotnet once to get it pre started
# This will save time on build later
RUN dotnet --info

# Install Node JS LTS (10.x)
RUN sudo curl -sL https://deb.nodesource.com/setup_10.x | sudo -E bash -
RUN sudo apt-get install nodejs

# Install NPM Packages
RUN sudo npm install -g @angular/cli
now that we have our Docker-file all set-up we can go ahead an run the build image command.
You can replace the two parts separated by the “:” with anything we like below like this: “myname/myimages:latest-ubuntu-something”
# Run docker build
docker build -t itniels/build-image:ubuntu18.04-dotnetcore3.0.1-nodejs10 .
this will start the process of building the image by taking a copy of the base Linux image, and run all of our commands inside the container before saving it. This might take just a little while.
Once it is done we can see the images we currently have using this command:
docker image ls

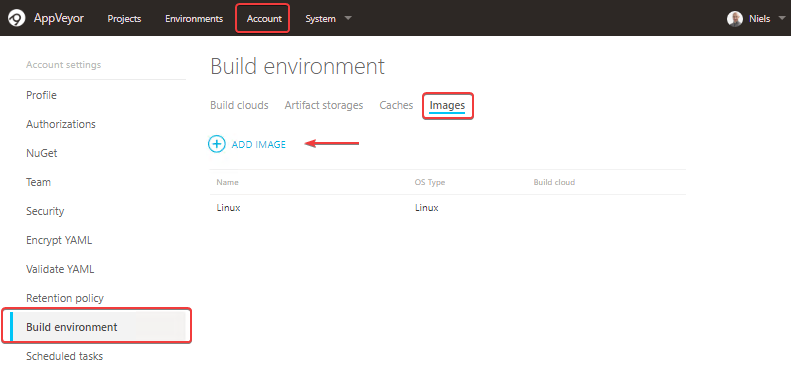
Add image in AppVeyor
Now to use the image we have to do a little bit of setup in AppVeyor for it to know about the image we just created, and to create an alias we can use in our AppVeyor config.
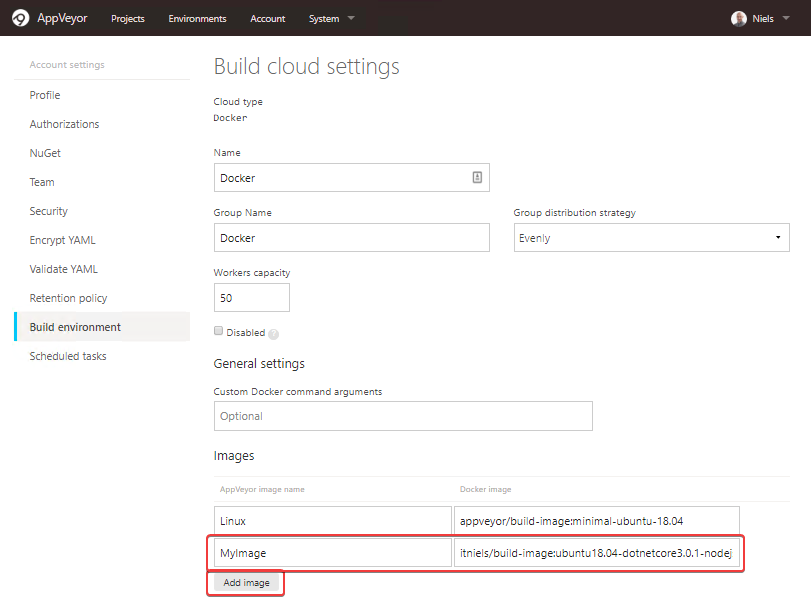
To add a new Image to AppVeyor that we can reference in scripts we go to Account → Build Environment → Images
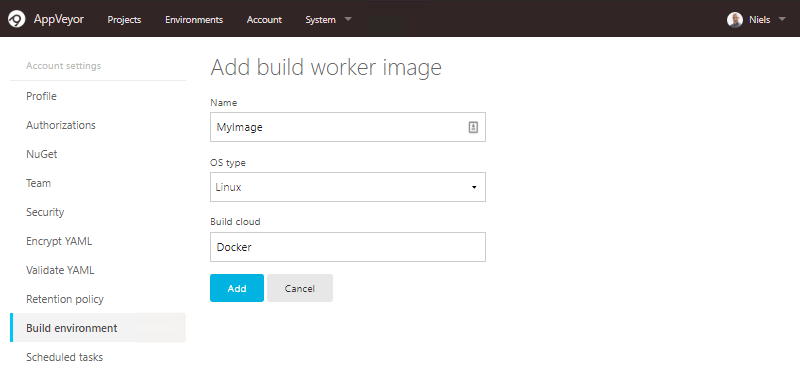
We then link that with our Docker build image like this
Usage
Now that we have our build image all setup, and AppVeyor is aware of it, we can now use it inside of our build scripts!
#---------------------------------#
#    environment configuration    #
#---------------------------------#
build_cloud: Docker
image: MyImage
And this will use our new image when starting a build!
 Hi, my name is Niels, I am a passionate software developer from Denmark with a love for coding and solving real-world problems! I taught myself C# back in 2012 in my spare time and I loved it! I went on and graduated from Computer Science in 2016 where I got hired by