Shrinking a KVM virtual disk file is always scary! data-loss is a very real risk. Also it is not always you can get it down to the exact size you want.
But here are the steps to shrink your disk, please know that it is as always on your own risk! so you are warned. But these are the steps that i use every time, and wanted to share them with you. 🙂
First things first! BACKUP!
Since this is a virtual system, and we have the luxury of easy backup using vzdump, please go ahead and do that first 😉
Shrinking the partition
Now there are way too many Operating Systems to cover here in this post, but first you need to delete data to get it down below the size you want, and then shrink the internal partition!
This is done very easy in windows in the disk manager, for linux OS’ you need to find a guide that works for your OS.
Shut down the virtual machine
When you are done, shut down the VM and make sure it is stopped before proceeding.
Shrinking the disk file
Now log into your proxmox host via SSH and get ready to run some commands 😉
How low can we go
First off we need some information about how many sectors are used.
Navigate to your VMs image folder:
cd /var/lib/vz/images/<VMID>
Now we mount the device as a “loopback” so we can run some commands against the disk:
losetup -fv /var/lib/vz/images/<VMID>/vm-<VMID>-disk-0.raw
Now that the disk is mounted as /dev/loopback0 we can display information about the sectors of the disk:
fdisk -c -u -l /dev/loop0
The result will look like this:
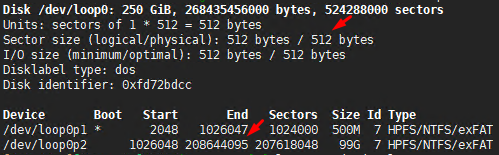
The important information we need highlighted with arrows above.
The Sector Size Bytes and the last line where we can see the sectors End as we cannot go below this without destroying data!
We unmount the disk again
losetup -d /dev/loop0
Now we can make a shrunk copy of the disk using the information above, but we add +2 to the end of the sectors!
dd if=vm-<VMID>-disk-0.raw of=vm-<VMID>-disk-1.raw bs=512 count=208644097
Once it is done copying the disk file (takes a while depending on size) We need to edit the config file to use the new disk.
nano /etc/pve/qemu-server/<VMID>.conf
Find the line for your disk:
scsi0: local:720/vm-720-disk-1.raw,size=99.5G
Edit the disk file and the size to the new.
Now boot up the VM and see if it works before deleting the old image 😉
 Hi, my name is Niels, I am a passionate software developer from Denmark with a love for coding and solving real-world problems! I taught myself C# back in 2012 in my spare time and I loved it! I went on and graduated from Computer Science in 2016 where I got hired by